

How to play
- Procedure to play
 Configuration first time
 How to add locomotives (excluding mfx locomotives)
- How to edit locomotives
- How to delete locomotives
- How to add mfx locomotives
- How to control locomotives on the cab panel.
- Key board mapping.
- Bottom function bar
- Right function bar
 How to control 2 or more locomotives sametime.
 How to control turnouts, solenoids, signals, accessories.
- How to change images of turnouts, solenoids, signals, accessories.
 How to control a locomotive without registration.
 How to control turnouts and signals uisng track diagram.
 How to learn your control.
 How to register external applications to use to RUNFILE script function.
 How to play with multiple screens.
 How to play automatic control.

Tool bar of Desktop Station.
Procedure to play.
- Run Desktop Station
- Configuration (if needed)
- Press START button.
- Check CTrack power on.
- Register your locomotives.
- Enjoy!
Configuration first time
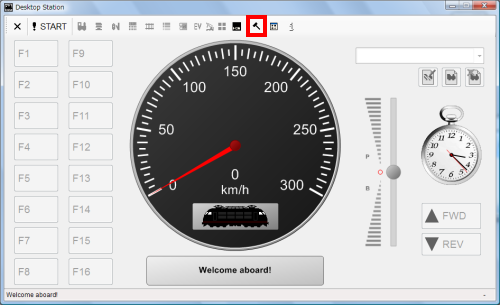
- Run Desktop Station
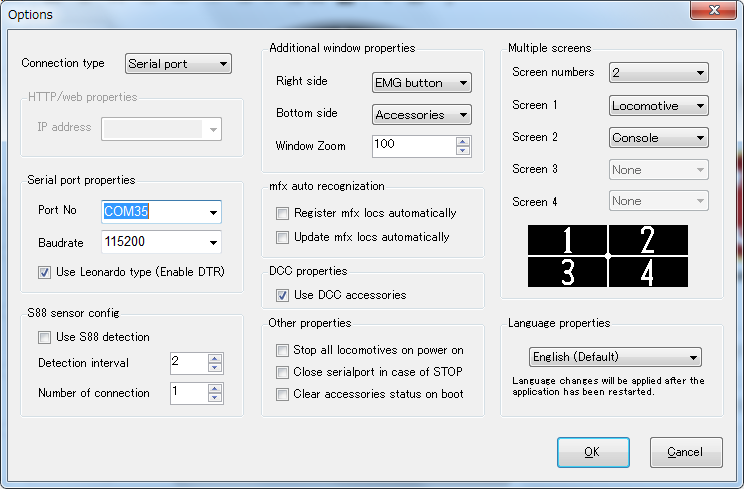
- Press hammer button. Please configure serial port for first time.
- Port name is defined by your own computer. Please choose port lists in the drop down box.
- Default baudrate is 115200bps. If you changed baudrate in the Serial_RSx.ino, you have to type your own baudrate.
- If you want to use S88 decoder, Check "Use S88 detection".
- You can adjust window size. Check Window zoom parameter. 100 means 100 percents size of window. You can set maximum 300 percent size.
- If you use MS2 and 60113 connection kit (Railuino), Check "Register mfx locs automatically.".
Note: If you use MS2 together, please not check "Register mfx locs automatically.". Mfx recognization process may confuse.
Descripton of each panel
Cab panel.
Multiple locomotives control panel.

Accessories panel.
Track diagram panel.
6021 keyboard panel.

Script panel.

S88 sensor control panel.
How to add locomotives (excluding mfx locomotives)
Open Cab panel. Then click  . Type Locomotive address and select the protcol.
*Note:
Locomotive image is editable. You can choose your image for locomotive panel. Icon image files are downloadable followings for free.
- Yamazaki Railway Collection List of railway icons (Japanese only)
- Lokbilder (Recommended, Germany only)
- MM Bildschirmschoner Galerien (Germany only)
- Railway Icon Collections (Japanese only)
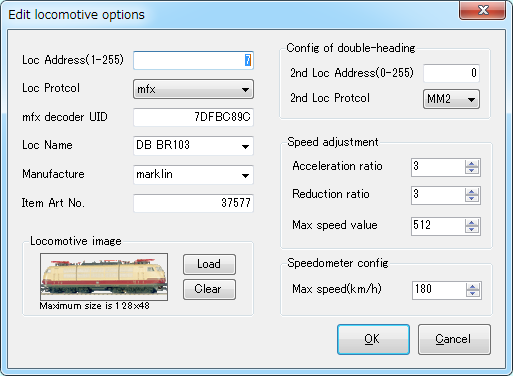
Locomotive editor. You can register your locomotives.
How to use Loc Editor
| Item | mean of value | How to set |
| Loc Address | Locomotive Address | set your locomotive address |
| Loc Protocol | Locomotive Protocol | set suitable protocol for your locomotive. You can select MM2, mfx, DCC. MM2 means marklin old digital system. Marklin AC compatible locomotives are suitable MM2. The mfx is current marklin standard protocol. DCC is not AC protocol but using as digital control system for not marklin manufactures system. |
| mfx decoder UID | mfx locomotive unique ID | This parameter is available only on the mfx loco. A loc data including this UID is automatically added when trackbox recognizes the mfx loco. If you know UID in the mfx loco, you can edit manually this paramter. |
| Loc Name | Locomotive Name | set useful name to play. |
| Manufacture | Locomotive Manufacture Name | This item isn't used. Please use as notes. |
| Item Art No. | Locomotive Art Number | This item isn't used. Please use as notes. |
| Config of double-heading | 2nd Loc address | set 2nd locomotive if you will play double-heading. If set 0, not applied double-heading. |
| Speedometer config | Max speed | This value is used on speed displayment of meter box. |
| Speed Adjustment | Acceleration ratio, Reduction Ratio, Max Speed Value | Ratios are used when you plays with power control mode with regard to control lever. Max speed value refers locomotive's maximum speed when playing. "1023" is maximum speed. for example, "512" means half of maximum speed. |
| Locomotive image | - | 128x48 image file is available. Available file extentions are PNG, GIF, BMP, JPG. You can find many image icons in this site. |
How to edit locomotives
Open Cab panel. Then click  . You can edit the locomotive data.
How to delete locomotives
Open Cab panel. Then click  . You can delete the locomotive data.
How to add mfx locomotives
Mfx locomotives need different procedure to add to Desktop Station. You can select 2 methods. One is using with MS2 if you played with MS2. The other is not using with MS2.
The reason why connects with MS2 is to apply same address of mfx locomotive. Mfx locomotives don't have locomotive address but they have mfx UID(Unique ID). MS2 or CS2 or Desktop Station links mfx UID and their locomotive addresses. This link process is worked in the first recognization (first time) and update intervals (every few days) by 60113.
Not using with MS2: Connect Arduino and CAN-BUS Shield to 60113.
Note: If the mfx locomotive had connected to the 60113, you may have to wait a few days while not putting on the rail.
Automatically data of the mfx locomotive is added when tracbox recognize the mfx loco.
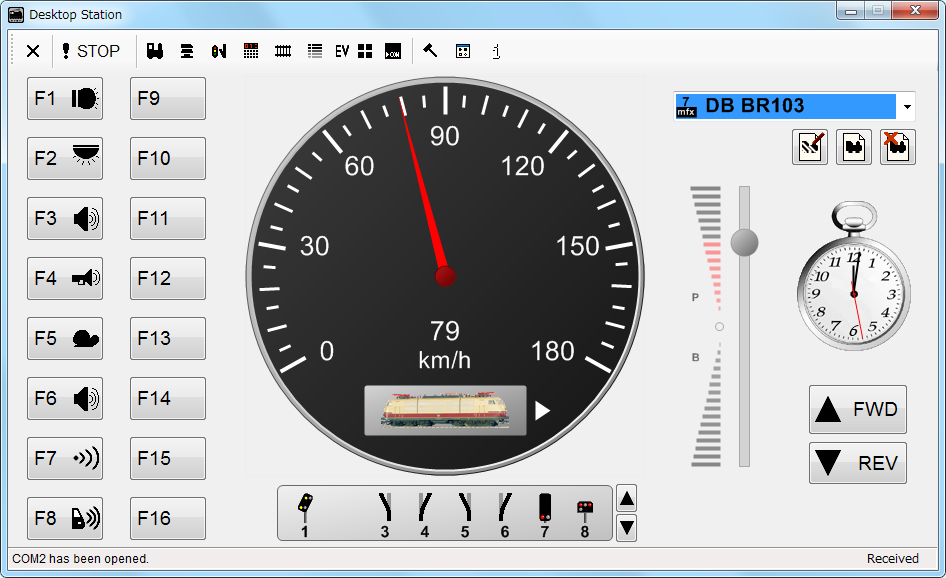
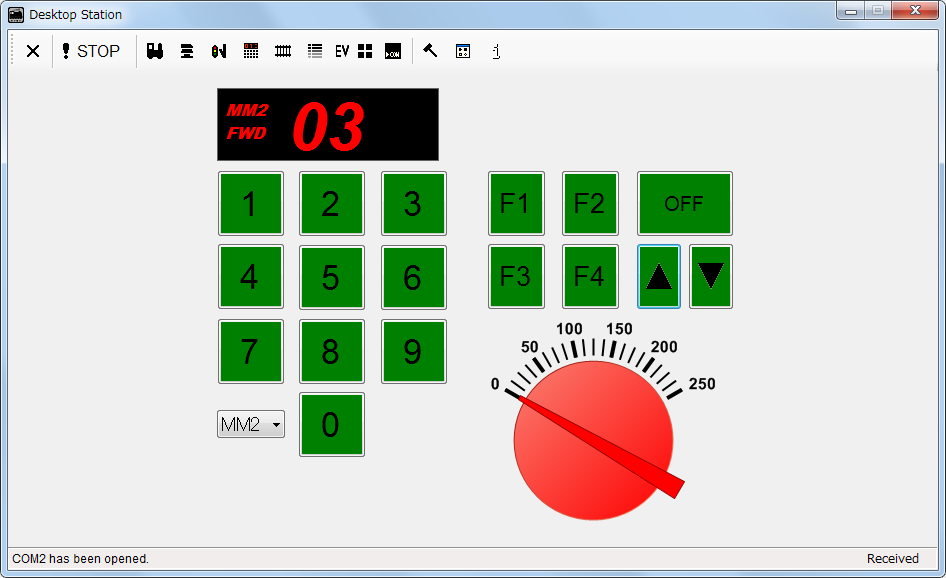
How to control locomotives on the cab panel.
You can control a locomotive using meter and lever. The meter is controlable. Also the lever is controlable and you can select lever modes which are speed mode and power mode. You can select when right click on the lever.
Functions that locomotives have are available in the Cab panel. These function buttons are selectable. You can select when right click on the button.
Cab panel.
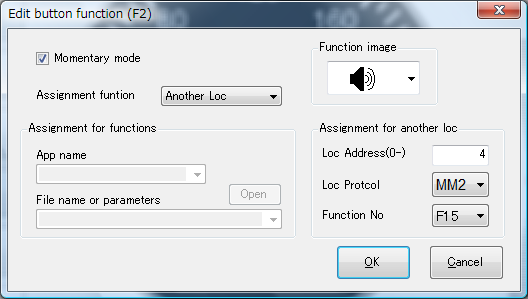
Function button editor
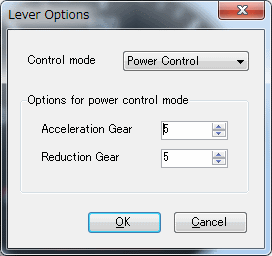
Throttle options
Key board mapping.
Using keyboard is available. The key board mapping(assignment) is based on BVE5. Because BVE5 supports train joysticks.
Keyboard mapping table
| Key | Assigned function | Note |
| Escape | Power off | Turn off CTrack power. |
| F1-F12 | Function 1-12 | for locomotive sounds and the othe function. |
| Page Up or Z, Mouse wheel up | Increment loc speed | BVE5 key compatible |
| Page Down or A, Mouse wheel down | Decrement loc speed | BVE5 key compatible |
| Period | Free loc brake | BVE5 key compatible |
| Comma | Apply loc brake | BVE5 key compatible |
| Home | Loc direction | Toggle locomotive direction |
Bottom function bar
Accessories and S88 sensor information are shown at bottom function bar.
Additional function options (Bottom)
 | Accessories controller |
 | S88 sensor viewer. |
Right function bar
Clock and Emergency button are shown at right function bar. You can edit the clock option when the clock click.
Emergency button stops all registred locomotives when click.
Additional function options (Right)
 | Emergency Stop | You can stop all of locomotives. |
 | Train clock | You can play using this clock as specified time. You can edit the time when clock clicks. |
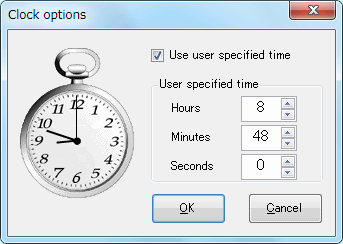
Clock options
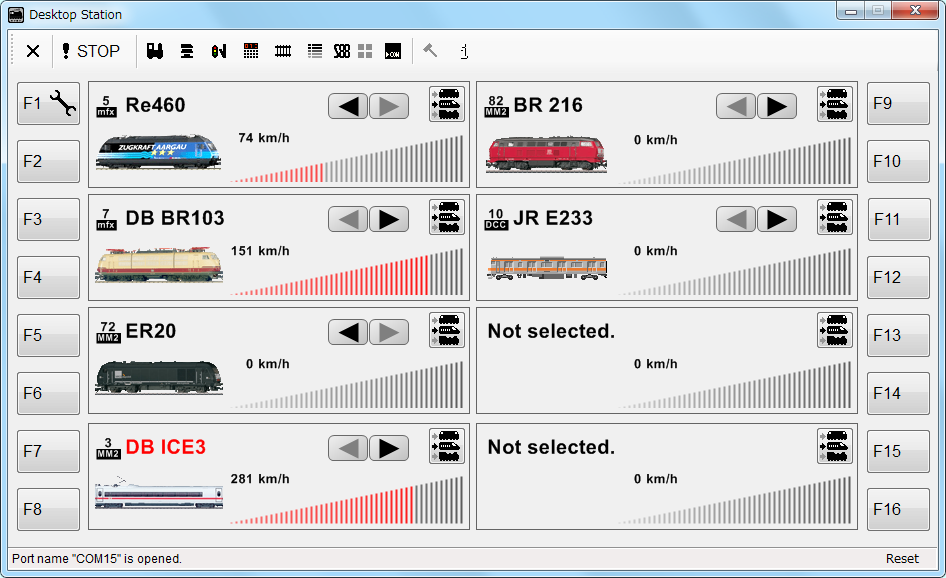
How to control 2 or more locomotives sametime.
Open Multiple Cab panel. You can control maximum 8 locomotives on this panel. This panel links with Cab panel. Controlled locomotive speed refers immediately the other panel.
How to control turnouts, solenoids, signals, accessories.
Open Accessories panel. You can control maximum 320 turnouts or signals on this panel. This panel links with Track diagram panel.
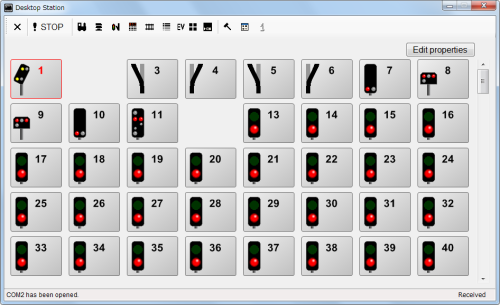
Accessories panel.
How to change images of turnouts, solenoids, signals, accessories.
Open Accessories panel. Click a turnout or a signal which you want to change. Then click "Edit Option" button at the top and right.
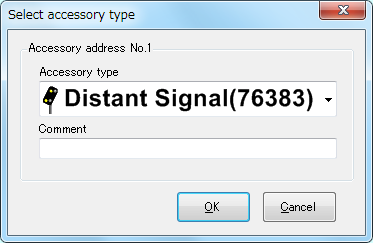
Edit option.
Selectable images are the followings. Some images occupy 2 addresses, for example 3-way turnouts.
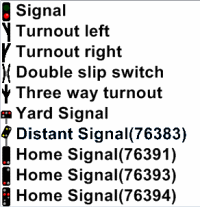
Selectable images of accessories.
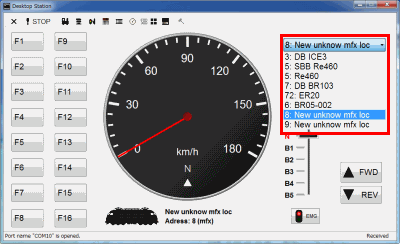
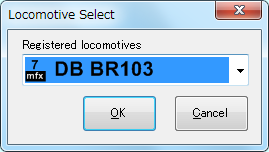
How to control a locomotive without registration.
Open 6021 keyboard panel. You can control immediately a locomotive to type a locomotive address and protcol.
This panel is useful to check running the locomotives.
6021 keyboard panel.
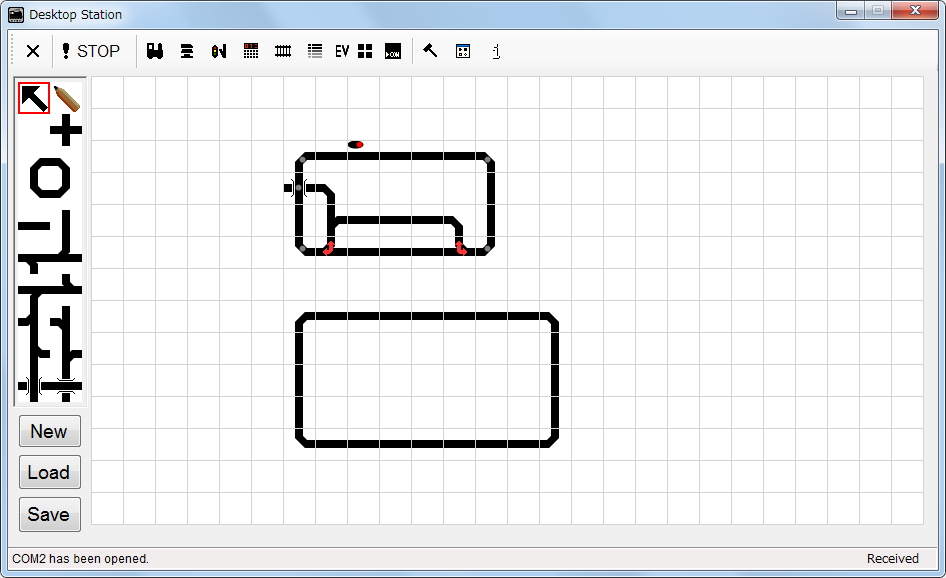
How to control turnouts and signals uisng track diagram.
Open Track diagram panel. You can edit track diagram and control it. Registered accessory addresses on the track diagram is linked with Accessories and S88 sensors automatically. If S88 funtction is available, S88 sensor indicator is available.
If you want to edit track diagram, click a rail image on the rail images of left side.
Track diagram with control mode.
If you want to assign an address of turnouts and signals to rail images, click a pencil image on the rail images of left side.
Track diagram with assign mode.
Then double click a rail and edit the option.
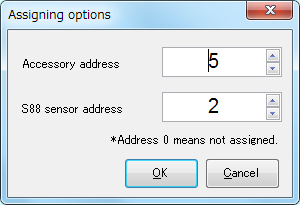
Assignment of solenoidos or signals, and S88 sensor address.
How to learn your control
Click button. You can use learning function.
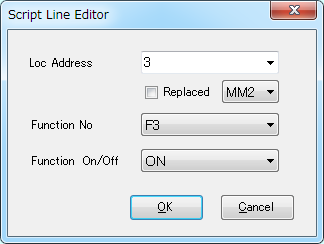
The learning function is available to learn your control and output as script data and CSV file. The script can play after the learning. Also the script can move to event script if you use copy and paste with popup window.
The script specification describes as followings. This specification is common with event script.
Specification table of script functions.
| Function name | Param1 | Param2 | Param3 | Notes |
| SPEED | Locomotive Address | Speed value (0-1023) |
- | Adjust a locomotive speed. |
| DIRECTION | Locomotive Address | 1:FWD, 2:REV | - | You can change direction of a locomotive. |
| FUNCTION | Locomotive Address | Function No | 0:OFF, 1:ON | You can operate locomotive functions which are sounds or lights. |
| ACCESSORY | Accessory Address (1-256) | 0:RED, 1:GREEN | - | Select a turnout direction and status of signals. |
| WAIT | Wait time (1 = 100ms) | - | - | Wait function for locomotive operation. |
| POWER | 0:OFF, 1:ON | - | - | Turn on or off 60113. |
| EXIT | - | - | - | Finish the script. |
| GOTO | Line number on the script. | - | - | Jump to the defined line. You can create a loop in the script. |
| GOTOLABEL | Line label name on the script. | - | - | Jump to the defined label. You can create a loop in the script. |
| SETFLAG | Flag Number (0-9) | a stored value(0-65535) | - | Set a value. This value is stored on the common flag management list. This flag is shared by all event script. |
| JUMP | Line labelname on the script. | Flag Number (0-9) | Equal value | Combination of GOTOLABEL and GETFLAG. Jump to the defined label if a value of flag number equals the equal value. You can create a conditional loop in the script. |
| LABEL | Line label name | - | - | Define a label. The label means an identification in the script. |
| INCFLAG | Flag Number (0-9) | a value (from -65535 to 65535) | - | Increment flag. Sum an value to value of flag. If you set a value to negative value, this function uses as decrement flag. |
| RUNFILE | Application name | Target file name | - | Run external file using registered application. |
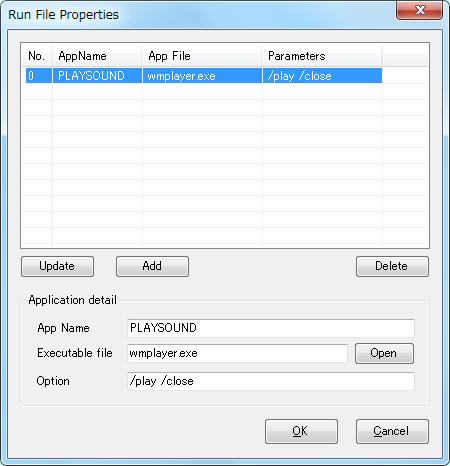
How to register external applications to use to RUNFILE script function.
Click button on the tool bar. You can register external applications to Desktop Station.
The registred external applications can use on the script function which is RUNFILE.
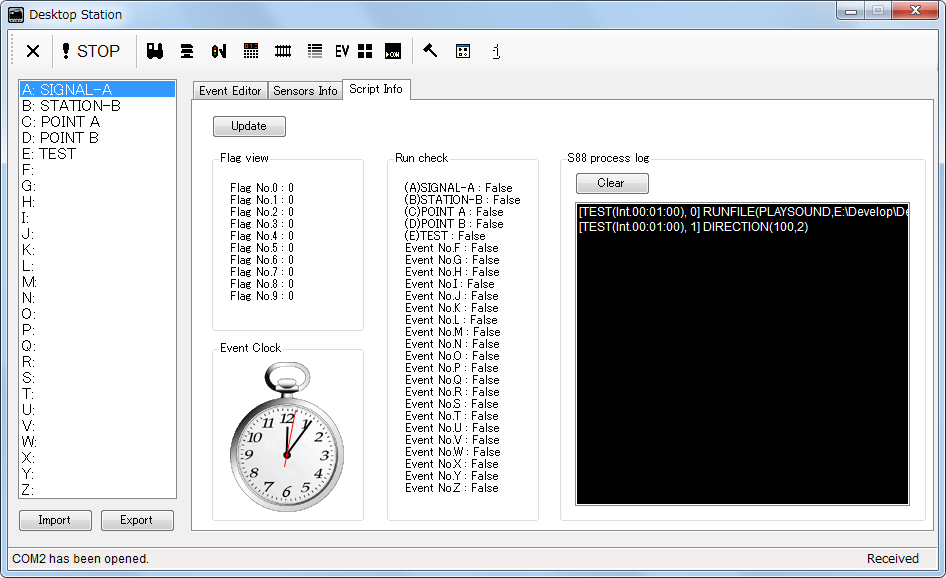
How to play automatic control.
Event script panel can provide automatic play working with S88 sensors and interval time, clock time. You can select start trigger types which are locomotive entering(S88) and leaving (S88), interval, clock.
Event script is available to register maximum 26 events.
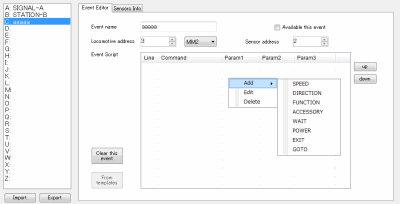
Table of description of event editor.
| Item | Example | Notes |
| Availabe this event | checked or non-checked | You can select availability of this event. |
| Event name | STATION-A | Type your favorite station name. |
| locomotive address | 1-255 | Type your locomotive's address. This address automatically replaces locomotive address of script functions when script function doesn't assign a locomotive address. Don't forget select protcol (MM2/mfx/DCC) too. |
| Start Trigger | Entering, Leaving, Interval, Clock | Entering and leaving mean the locomotive enters or leaves at the S88 sensor which can choose in the property. |
| Trigger condition | - | Shows the trigger timing and condition. This description changes with the your configuration. |
| Event script | - | You can edit an event script. |

Procedure to register an event.
Procedure describes as the followings.
- Open event script panel.
- Open event script editor tab.
- Click an event on the left events list.
- Set event name and locomotive address, event trigger.
- Click right on event script view. Add script function on the popup menu.
- If use, check "Available thi event."
- If Selected S88 sensor or trigger condition was detected, this event script will run then.
Example Template 1: Shuttle train
Below scripts are template of shuttle train. Please copy and paste to your script edit screen of Desktop Station.
Event A: Station A
In this example template, the locomotive address is 3 and MM2. Also trigger property is "entering", and sensor address is 1.
DESKTOPSTATION,SCRIPT,2013
SPEED,0,128,0
WAIT,10,0,0
SPEED,0,0,0
DIRECTION,0,2,0
WAIT,10,0,0
SPEED,0,256,0
EXIT,0,0,0
Event B: Station B
In this example template, the locomotive address is 3 and MM2. Also trigger property is "entering", sensor address is 2.
DESKTOPSTATION,SCRIPT,2013
SPEED,0,128,0
WAIT,10,0,0
SPEED,0,0,0
DIRECTION,0,1,0
WAIT,10,0,0
SPEED,0,256,0
EXIT,0,0,0
Example Template 2: alternative operation
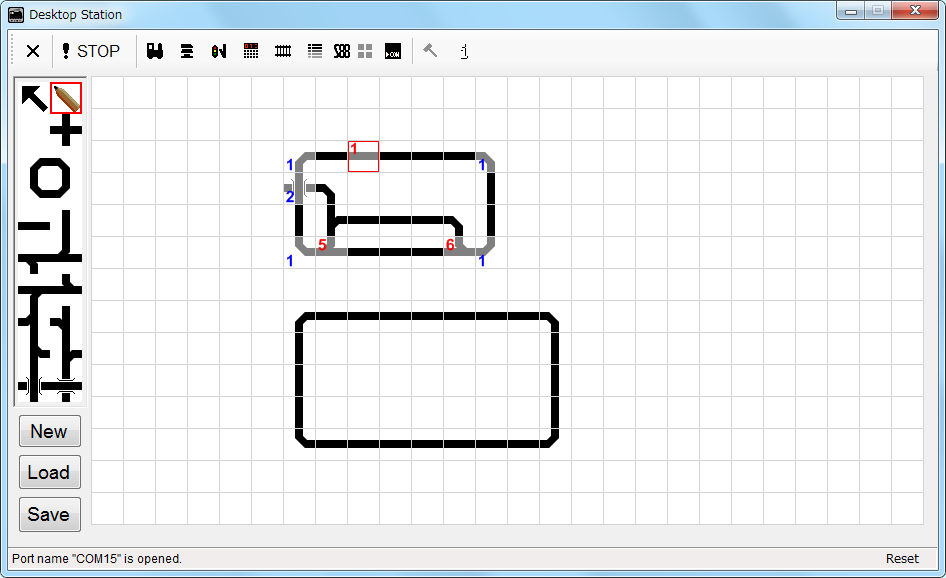
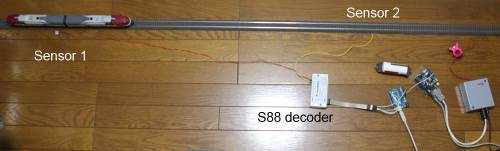
Below scripts are template of alternative operation. Please copy and paste to your script edit screen of Desktop Station. This example uses two turnouts and two locomotives, also two sensor rails. Turnouts are assigned as accessory address 5 and 6. Sensor rails are assigned as S88 sensor address 1 and 2.
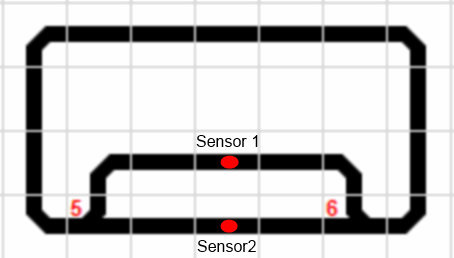
Layout figure of sensor points and turnouts.
Event A: Station A
In this example template, the locomotive address is 72 and MM2. Also trigger property is "entering", sensor address is 1.
DESKTOPSTATION,SCRIPT,2013
SPEED,0,64,0
WAIT,10,0,0
SPEED,0,0,0
ACCESSORY,5,0,0
ACCESSORY,6,0,0
WAIT,30,0,0
SPEED,3,256,0
EXIT,0,0,0
Event B: Station B
In this example template, the locomotive address is 3 and MM2. Also trigger property is "entering", sensor address is 2.
DESKTOPSTATION,SCRIPT,2013
SPEED,0,64,0
WAIT,10,0,0
SPEED,0,0,0
ACCESSORY,6,1,0
ACCESSORY,5,1,0
WAIT,10,0,0
SPEED,72,256,0
EXIT,0,0,0
Example Template 3: Using flag and jump commands.
This templates shows how to use flag and jump commands. This event works as below.
- Go reverse when the loc enters twice on the sensor.
- Go forward when the loc enters five times on the sensor.
Event A: Count number of entergin loc on the S88 sensor 1.
In this example template, the locomotive address is 2 and MM2. Also trigger property is "entering", sensor address is 1.
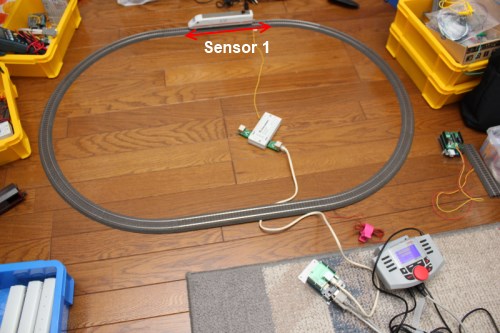
Layout of this example.
DESKTOPSTATION,SCRIPT,2013
INCFLAG,1,1,0
JUMP,IF_A,1,2
JUMP,IF_B,1,5
EXIT,,,0
LABEL,IF_A,,0
SPEED,0,0,0
DIRECTION,0,2,0
SPEED,0,80,0
EXIT,,,0
SPEED,,,0
LABEL,IF_B,,0
SPEED,0,0,0
DIRECTION,0,1,0
SPEED,0,80,0
SETFLAG,1,0,0
EXIT,,,0